|
 |

-
2 Tubes
1 Deco (annex)
2 Masks (attached)
Toadies plugin
Simple Plugin
Graphic Plus Plugin
Filter Factory Gallery B plugin
Lenk´s Plugin
Alien Skin Eye Candy 5 Impact Plugin
AP Lines Plugin
- Video
AQUI
- PSP Effects
Materiais
HERE
Script
Click on the butterfly to follow the tutorialClique na borboleta
para seguir o tutorial

Let's
start!!!
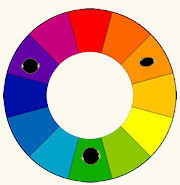
1.- Open the color wheel on psp
2, - Choose three colors by skipping every 3
colors according to the model
-
 -
-
3- Place one of the colors in the
Foregraund and another in the Backgraund
4.- I put it on Foregraund # ff9400 on Background # 0fad00 # f4c01c
5.-Open a 900 x 600 px transparency and fill it with your Backgraund
6.- Plugin Toadies> Sucking Toad Bevel II.2 = Default with Bevel Width = 255
7.-Image Effects> Seamless Tiling = Default with Transition = 100
8.-Simple Plugin> Blitz
9.- Image> Flip Vertical
11.-Repeat item 8
12.-Adjust> Sharpen More
13.-Plugin Graphic Plus> Vertical Mirror = Vertical Origin = 125
14.-Selections> Load Save / Selections> Load Selection from Disc and locate
tres_cores
15.-Layers> New Raster layer
16.-Fill with your Backgraund and remove the selection
17.-Plugin Filter Factory Gallery B> Circulator = Default only to
Transparency = 100
18.-Plugin Filter Factory Gallery B> Gradient Windows = Default with Frame
Width = 20
19.-Lenk´s Plugin> Katharina = Default
20.-Image> Horizontal Mirror
21.-Repeat item 19
22.-Blend Mode = Multiply
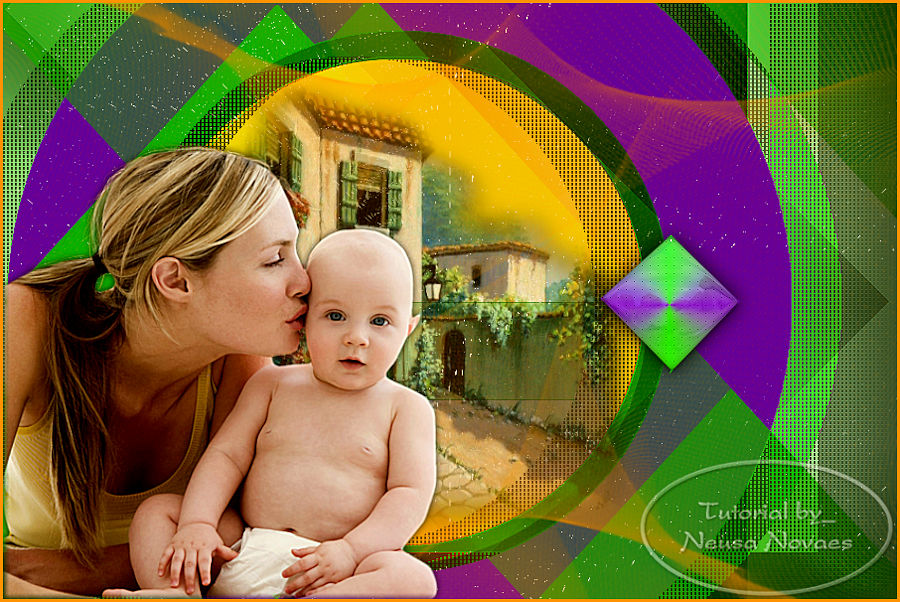
23.-Edge Effects> Enhance More
24.-Open, copy and paste the deco_tres_cores in a new layer
25.Blend Mode = Screen
26.-Layers> New Raster Layer
27.-Fill with Foregraund
28.- Apply the attached Narah_mask_0384 Reversed and Merge Group
29.- Duplicate - Image> Mirror Vertical and Image> Mirror Horizontal
30.- Selections> Load Save / Selections> Load Selection from Disc and locate
tres_cores_2
31.- Layers> New Raster Layer
32.- Fill in your Foregraund and Blend Mode = Screen and deselect
33.- Layers> Arrange> Move Down 3 times
34.- Layers> New Raster Layer
35.- Fill with the Backgraund
36.- Apply to JrArgentin_mask_ivana2 with the marked invert and Merge Group
37.- Layers> Arrange> Move Down 1 time
38.-Put the third color on your Foregraund
39.-Selections> Load Save / Selections> Load Selection from Disc and locate
tres_cores_3
40.- Layer> New Raster Layer and fill with your Foregraund and deselect
41.- Layers> Arrange> Move Down 1 time
42.- Activate the top raster and Layers> New Raster Layer
43.-Selections> Load Save / Selections> Load Selection from Disc and locate
tres_cores_1
44.- Make a Radial 90 - 3 gradient with the third color and fill the
selection
45.- Alien Skin Eye Candy 5 Impact> Glass> Clear plugin with Reflections =
Default
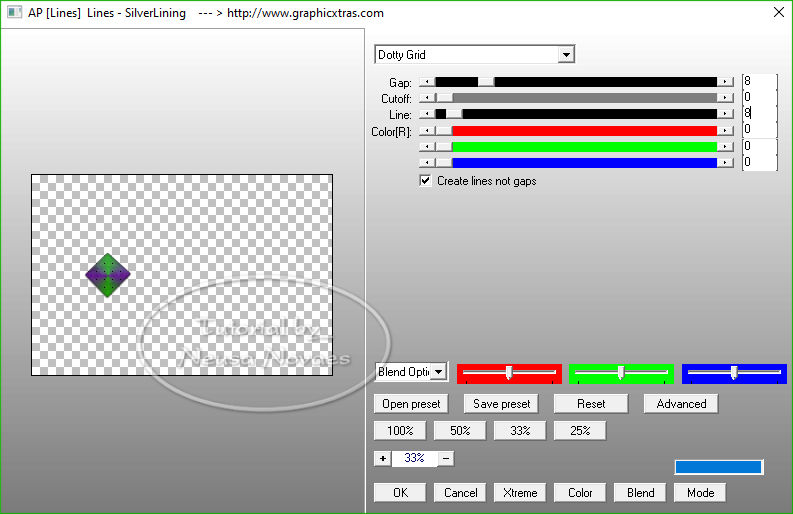
46.- Plug Lines Ap Lines> SilverLing as shown-
-
- 47.-Apply eyeshadow = 0 - 0 - 80 -
30.00 black color
48.-Adjust> One Step Photo Fix and duplicate
49.- Image> Horizontal Mirror and Merge Down
50.- Activates raster 2 and Layers> Arrange> Move Up being 2 times
51.- Go back to raster 4 and Layers> Arrange> Move Down 1 time
52.- Open, Copy and Paste the landscape tube in a new layer and position it
as you like
53.-Adjust> Sharpness> Sharpen and Apply eyeshadow = 0 - 0 - 80 - 10.00
black color
54.- Place yourself at the top
55.- Open, Copy and Paste the main tube in a new layer
56.- Adjust> Sharpeness> Sharpen More
57.- Apply eyeshadow = 0 - 0 - 80 - 10.00 black color
58.- Image> Add Border = 3 px in the color that matches
59.-Put mine and your brand
60.-Merge Visible (if done in a new layer)
61-Resize = 900 px and Save as JPG
-
-

-
-
- ** Tutorial created by Neusa Novaes **
May 06, 2020
Copyright reserved
Any similarity is purely coincidental.
Total or partial transfer, copies, alterations prohibited
publication on websites or blogs, without authorization from the author.
NOTE: - Do not forget to place the credits to those entitled
Credits
Main Tubes: -Hebe, Rosanne and Masks Narah
and Ivina2


|