TOP THE FOREST
Terms of use
Materials
2 Tubes
Alpha
HERE
VM Tools Plugin
Plugin & BKG Kaleidoscope
Plugin AAA Frames
AAA Filters Plugin
Tutorial on EML
HERE
Video Tutorial
HERE
PSP Effects
Click on the butterfly to follow the tutorial
-
Let's
start!!!
1.- Choose two colors put dark to
foreground I chose # 3b2c19 and in the
background I chose # c0390a
Make a Radial gradient according to printe
-
2.-Open
the attached Alpha Channel
3.- Fill with your gradient
4.-Adjust> One Step Photo Fix
5.- VM Tools Plugin> Radial Mosaic = Default
6.- Effects> Edge Effects> Enhance More
7.-Layers> Duplicate
8.-Image> Resize = 90%
9.-Apply Drop Shadow = 0 - 0 - 80 - 30,00 in
black color
10. Activate Raster Merged
11.-Plugin & BKG Kaleidoscope> & BlueBerry
Pie
12.-Change the Blend Mode of the Raster from
above to Luminace L or other
depending on the chosen color
13.- Continue on Merged and apply Drop
Shadow = 0 - 0 - 80 - 10,00 black color
14.- AAA Plugin Frames> Photo Frame = put 10
only in the first one
15.- Activate the Top Raster
16.- Open copy and paste as new layer the
landscape
17.-Adjust> Sharpness> Sharpen
18.-Opacity = 50% other depending on your
tube
19.-Open, Copy and paste as new layer the
woman's tube
20.-Resize it +/- 55%
21.-Adjust> Sharpness> Sharpen
22.-Alien Skin Eye Plugin Impact Impact>
Perspective Shadow according to printe
-
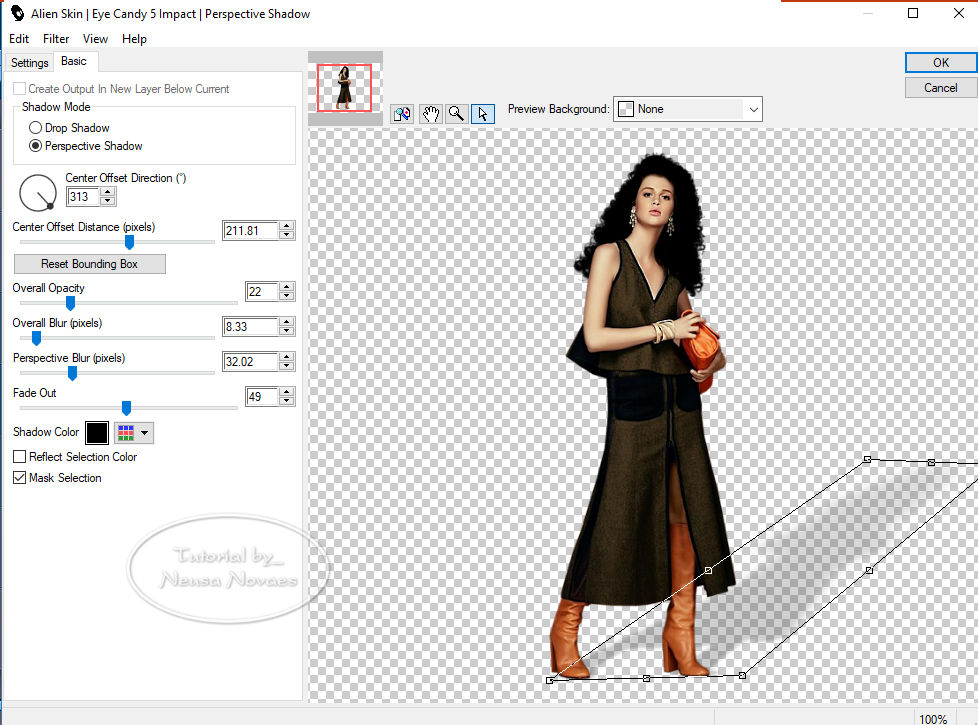
-
-
- 23.-Layers>
New Raster Layer
24.-Selections> Load / Save
Selection> Load Selection From Alpha
Channel
and locate # selection1
25. Fill in your gradient and put
Drop Shadow to taste
26.-Take the selection
27.-Layers> Duplicate
28.-Image> Resize = 80%
29.-Layer> Duplicate again and Image>
Resize = 80%
30.- Merge Down 3 times and
duplicate again
31.-Image> Horizontal Mirror and
Merge Down
(It is optional to place at the top
and bottom, if you wish you can do
it with the
Object> Align> Botton and pull up
slightly)
32.-Layers> New Raster Layer
33.-Put your signature and mine and
Merge Visible
34.-AAA Filters Plugin> Custom =
Landscape or other depending on your
colors = OK
35.-If you want to do animation
continue if you do not want to save
in jpg
TO MAKE ANIMATION
36.-Duplicate item 30 + 2 times
37.-In each raster put Adjust> Add /
Remove Noise = put once of each
(Randon-Uniform-Gaussian) with the
same Noise = 30
38.-Take the visibility of the two
copies
39.-Edit> Copy Special> Copy Merged
and take to AS (Animation Shop)
40.- No AS cole as new Animation
41.-Go back to your PSP and take out
the visibility of the next one and
- return the
visibility of the copied raster
- 42.-
Repeat item 36 and paste as After
Current Frame
43.- When you put all the rasters
click on VIEW in the AS to see its
movement
44.-Save your art in gif

NOTE: - Do not forget to put the
credits to the right ones.
** Tutorial created by Neusa Novaes *
February 8, 2019
Copyright reserved.
Prohibited total or partial transfer, copies, alterations
publication in websites or blogs, without author's authorization.
Credits
Tubes Principal: Gabry and Denesi Worisch
Selection: -Bea for the Challenge
|
| | |

