To print this page
Script
Click on the butterfly to follow the tutorial
1.-Open a 900 x 600 px transparency
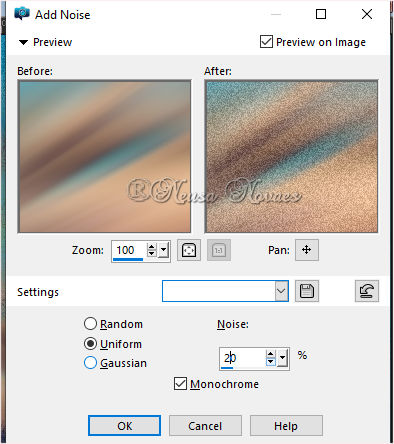
9.-Doubles 10.-Image> Horizontal Mirror 11.-Blend Mode = Darken 12.-Merge> Down 13.-Adjust> Add / Remove Noise> Add Noise as shown
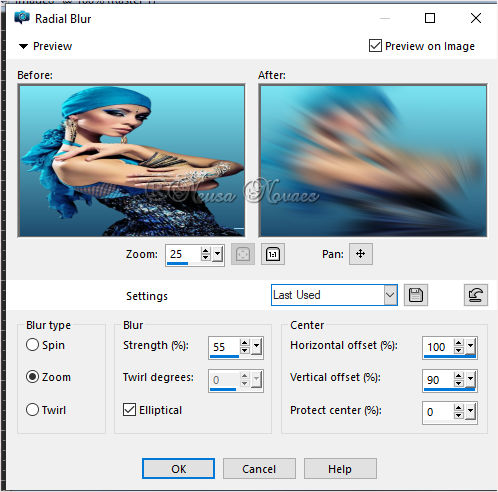
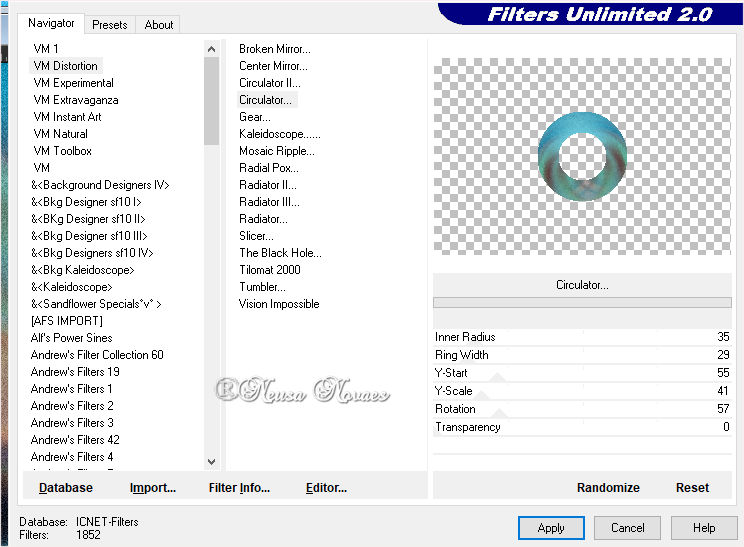
14.-Doubles 14.-Apply Mask (attached) and Merge Group 15.-Apply Drop Shadow = 0 - 0 - 80 - 10.00 black color 16.-Adjust> Sharpness> Sharpen More 17. Shoot the Raster 1 18.-Doubles again 19._Layers> Arrange> Brig to top 20.-VM Distortion Plugin> Circulator as shown
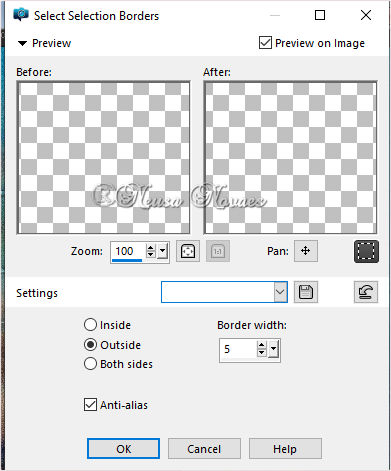
21- Apply Drop Shadow again according to item 15 22- Activate the Pick Tool and place it according to the model 23- Adjust> One Step Photo Fix 24- Selections> Load / Save Selection> Load Selection from disk and locate the selection_01_NCN (attached) 25-Layers> New Raster Layer 26- Selections> Modify> Select Selection from Borders as shown
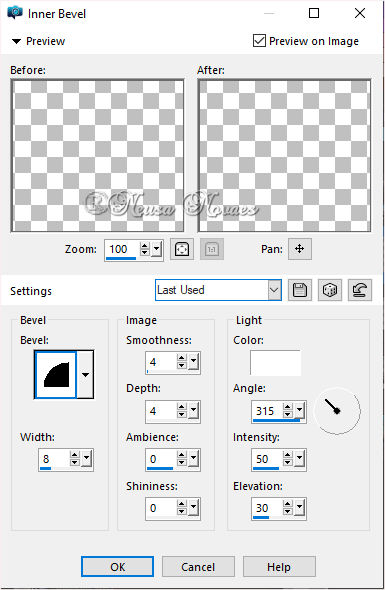
27.-Remove the visibility of Raster 1, Group Copy Raster 1 and Copy Raster 1 28.- Fill the border with the inverted gradient 29.-Apply Inner Bevel as shown
27.-Remove the visibility of Raster 1, Group Copy Raster 1 and Copy Raster 1 28.- Fill the border with the inverted gradient 29.-Apply Inner Bevel as shown 30.-Deselect 31.-With the Magic Wand tool select the cent 32-Apply the same Drop Shadow 33-Layers> New Raster Layer 34- Open, Edit, Copy and paste Into Selection the landscape tube 35-Adjust> One Step Photo Fix (Optional) 36-Activate the raster 1 again 37-Adjust> One Step Phto Fix 38.-Activate the mask raster 39.-Open, Edit, Paste the attached deco tube as a new layer 40.-Adjust> Sharpness> Sharpen More 41.-Drop Shadow in the same configuration 42.-Activate the Top Raster 43.-Open, Edit, Coy and paste the main tube as a new layer 44.-Resize it if necessary 45.-Place to taste 46.-Repeat item 40 and add shade to taste. 47.-Merge Visible 48.-Layers> New Raster Layer 49.-Select and remove the visibility of Merged 50.-Fill with color that matches 51-Remove the selection and open the visibility 52-Put your credit and mine 53-Save as JPG
Any similarity is purely coincidental. Total or partial transfer, copies, alterations prohibited publication on websites or blogs, without authorization from the author. NOTE: - Do not forget to place the credits to those entitled
Tubes:-Deco, Paisage and Mask without authorship received from the exchange group, Principal of Isa  
|