 |

Terms of use
- 3 Tubes
- Flaming Pear Plugin
-
Tutorial on EML
HERE
Video
HERE
PSP Effects
Script
Click on the butterfly
to follow the tutorial
Let's start!!!
1.- Open your tube take two dark colors
for Foregraund dark I chose the
color # 060606 and the Backgraund color
light # bab179 and minimize
2.- Open a transparency of 900 x 600 px
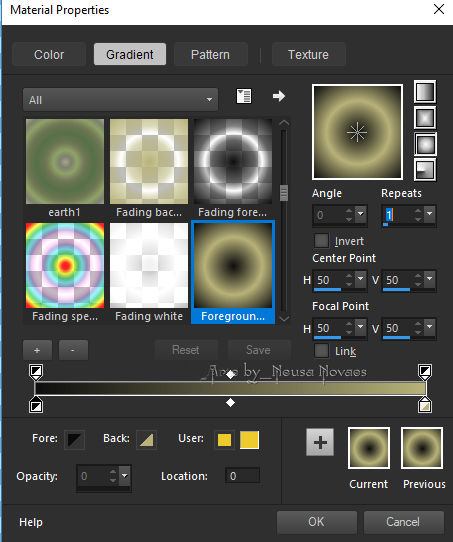
3.- make a Radial gradient according to
printe
-
-
- Fill your transparency with your
gradient
5.- Layers> New Raster Layer
6.- Fill with a Linear gradient 0 x 0 with lighter colors I chose
for Foregraund # 5f636f and Backgraund # 24282a
7.- Texture Effects> Fine Leather according to printe
-
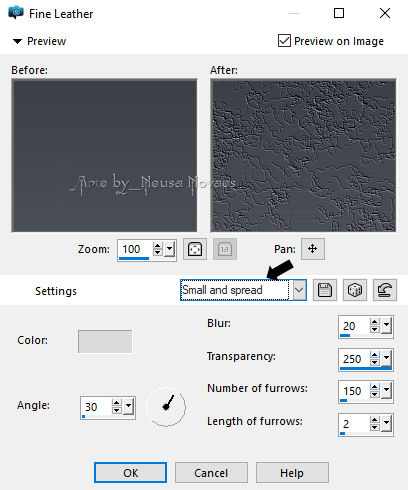
-
- 8.- Adjust> Sharpness> Sharpen
9.- Activate the Pick Tool mode Scale tool and carry it from top to bottom
up to 250 px
and from bottom to top up to 350px
10.- Change your Pick Tool to the Perspective mode and the light tip up to
80 px
11.- Inner Bevel being Bevel 6 according to printe
-
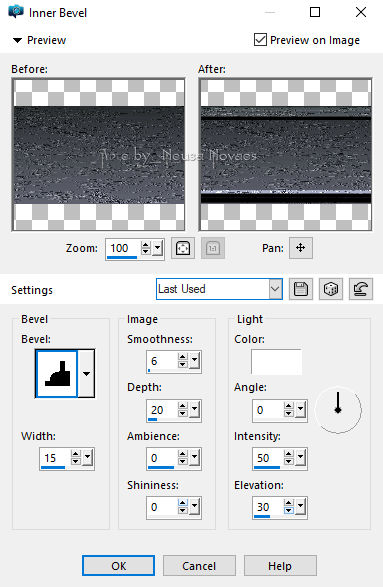
-
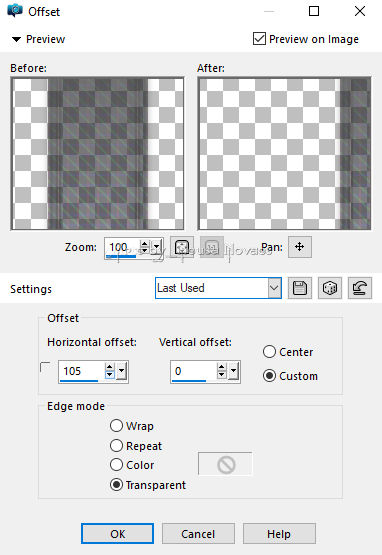
- 12.- Image Effects> Offset
according to printe
-
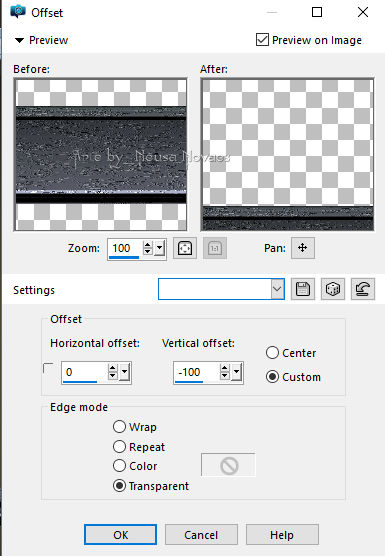
-
- 13.-Layers> Duplicate
14.- Repeat the same OffSet and Duplicate again
15.- Resize 80%
16.- With the selection tool select as printe
-
- 17.- Delete the selected part and
deselect
18.-Merge Down twice
19. Apply Drop Shadow = 0 - 0 - 80 - 30,00 in black color
19.-Layers> New Raster Layer
20.- Custom Selection according to printe
-

-
- 21. Fill in with your gradient of
item 6 in Opacity 50%
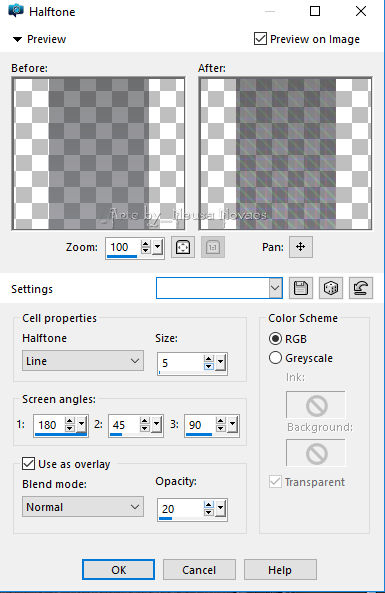
22.-Artistic Effects> Halftone according to printe
-
-
- 23.-Apply the same Inner Bevel from
item 11 take selection
24.-Apply Drop Shadow = 0 - 0 - 50 - 10,00 color black
25.-Duplicate
26.-Image Effects> Offset according to printe
-
-
- 27.-Duplicate again
28.-Repeat item 26
29.-Merge Down being twice
30.-With the Pick Tool in Scale mode, move down a little
(leaving you lying on the stairs if necessary)
31.- Reflection Effect> Rotating Mirror = 0 - 180
32.-Layers> New Raster Layer and select
33.-Open, Copy and Paste into your Landscape tube and deselect
34.-Adjust> Blur> Radial conform printe
-
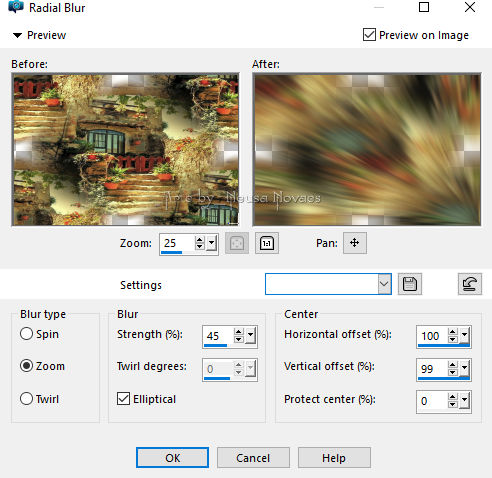
-
- 35.-Plugin Flaming Pear> Flood
putting 60 on Horizon the rest leave in Default
36.-Layers> Arrange> Move Down Being Twice
37.-Activate Raster 3
38.-Open your landscape tube place the mask 20-20 twice and merge group
39.-Copy and paste in new layer and place on the left side and
set the size if necessary
40.-Duplicate and Image> Mirror
41.-Open, copy and paste in new layer the main tube
42.-Put shade to taste
43.-Open, copy and paste in new layer your tube of pots, place
in one of the corners of the ladder according to model
44.-Duplicate and Image> Mirror also put Drop Shadow to taste
45.-Merge> Visible and Select
46.-Image> Add Border = 4 px in white color
47.- Selections> Invert
48.-Apply Drop Shadow = 0 - 0 - 80 - 50,00 color black
49.-Image> Add Border = 4 px in color that matches your top
50.-Image> Add Border = 4 px in white color
51.-Image> Add Border = 10 px in the same color as your combination
52.-Image> Add Border = 4 px in white color
53.-Image> Resize = 900 px
54.-Adjust> One Step Photo Fix
55.-Put mine and your mark
56.-Save in JPG
-

-
-
- ** Tutorial created by Neusa Novaes **
July 1, 2019
Copyright reserved
Any similarity is purely coincidental.
Prohibited total or partial transfer, copies, alterations
publication in websites or blogs, without author's authorization.
NOTE: - Do not forget to put the credits to whom right
 Crédits Crédits
Tubes:- Anna
Br, LB e Mary
Degrau
Escada:- Top Mineko
|

