-
-
-
Materials
2 Tubes
Alien Skin Snap Art Plugin
Muras Meister Plugin
Alien Skin Eye Candi 5 Impact Plugin
Plugin AAA Frames
AAA Filters Plugin
PSP Effects
Script
Click on the butterfly to follow the
tutorial
-
-
Let's start!!!
-
-
-
1. Choose two colors from
your tube for Foreground Dark Color
-
I chose # 40412f and on Light
Background Background I chose #
f1f57c
-
Make a Linear gradient 0 - 1
-
-
2.-Open a transparency of 900 x 600
px
-
and fill your transparency with the
gradient
-
3.- Duplicate and apply mask262_sigrid
and merge group
-
-
4. Apply Drop Shadow with the color of
your foregraund = 0 - 0 - 80 - 10,00
-
5.-Apply again the same Drop Shadow with
the black color
-
-
6.-Image> Free Rotate = Right - 90
-
7.-Activate Raster 1
-
-
8.-New Layer and select
-
-
9.-Open, Copy and Paste Into Selection
the landscape tube
-
-
10.-Adjust> One Step Photo Fix
-
-
11.-Activate the Mask raster (Group Copy
of Raster 1)
-
-
12.-Adjust> Add / Remove Noise> Add
Noise =
-
Uniform and Monochrome clicked and 40
-
-
13.-Activate Raster 1 again
-
-
14.-Alien Skin Snap Art Plugin> Impasto>
Abstract, Pastel Color
-
-
15.-Merge Visible
-
-
16.-Duplicate
-
-
17.-Muras Meister Plugin> Perspective
Tiling = Leave the settings
-
as it is only anchoring to 20 o Height
-
-
18.-Take the visibility of the Raster
under Merged
-
-
19.-With Magic Wand set the Feather to
30 and select
-
-
20.-Click the DEL button on your
keyboard 5 times and deselect
-
-
21.-Return to the visibility of Merged
-
-
22.-Apply Drop Shadow = 0 - 0 - 80 -
30,00 in black color
-
-
23.-Open, Copy and Paste in new layer
your main tube
-
(if necessary give it a resize)
-
-
24.-Adjust> One Step Photo Fix
(Optional)
-
-
25.-Sharpen
-
-
26.-Alien Skin Eye Candi 5 Impact
Plugin> Perspective Shadow> Drop,
Shadow, Lowest
-
-
27.-Open, copy and paste in new layer
the Corners_NCN
-
-
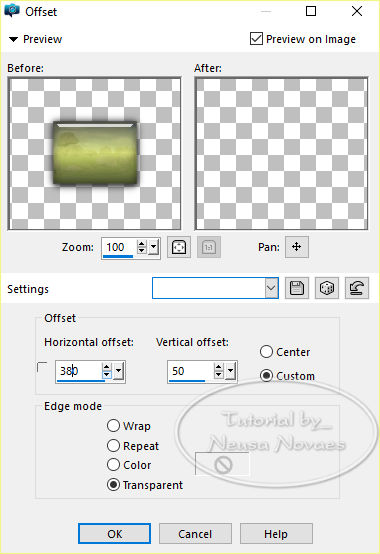
28.-Image Effect> Offset according to
printe
-
-
-
31.- Your Blend Mode = Optional
-
-
32.- Image>
Add Borders = 3 px foregraund color
-
-
33.- Image>
Add Borders = 3 px color backgraund
-
-
34.- Image>
Add Borders = 3 px foregraund color and
select
-
-
35.-Image> Add Borders = 30 px color
backgraund
-
-
36. -Invert
-
-
37.-AAA Plugin Frames> Texture Frame as
it opens
-
-
38.- Invert
again
-
-
39.- Apply
Drop Shadow = 0 - 0 - 80 - 60,00 in
black color and take selection
-
-
59.-Image> Add Borders = 3 px color
foregraund
-
-
48.- Image>
Add Borders = 3 px color backgraund
-
-
59.-Image> Add Borders = 3 px color
foregraund
-
-
60.- Put
your mark and my
-
-
61.-Resize = 900px
-
-
62.-AAA Filters Plugin> Custom =
Landscape
-
-
63.-Save your art in jpg
-
-
-

-
-
-
NOTE: - Do not
forget to put the credits to whom right.
-
-
** Tutorial
created by Neusa Novaes *
-
May 4, 2019
-
-
Copyright reserved.
-
Prohibited total or partial transfer,
copies, alterations
-
publication in websites or blogs,
without author's authorization.
-
-
-
-
-
 Credits Credits
-
-
Tubes Principal: CibiBijoux, Switzerland
Bella and Mask_262 Sigrid
|
| | |


