 Top Naise Minas

Terms of use
Click on the flag of your country, for translation.
Depending on your connection the translation may take a while
2 or 3 Tubes
Photoefex Plugin
Plugin AAA Frames
Dragonfly Plugin
Material HERE
Eml Tutorial HERE
Video Tutorial
HERE
Mark of Water
HERE
PSP Effects
1- Open a transparency 900 x 600 px
2- Fill in with the linear gradient Annex 150 - 0
3- Layers> Duplicate
4- Image> Mirror - Opacity 50%
5- Layers> Merge> Merge Down
6 - Photoefex Plugin> Scanlines = 1 - 2 - 20 - 10 - 0 - 0 Vertical unmarked = 2
times
7- Layers> New Raster Layer
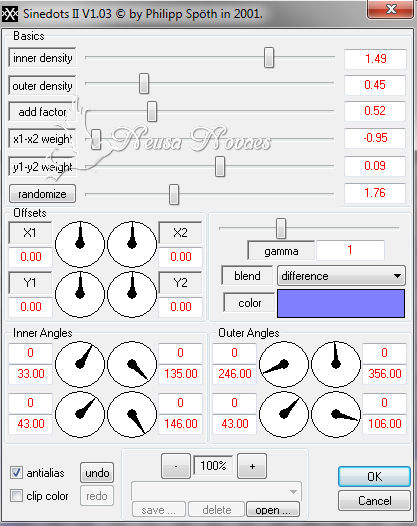
8- DragonFly Plugin> Sinedots2 according to printe
(matching color)
9- Effects> Edge Effect> Enhance
10-Image> Resize = 80%
11- Effects> 3D Effect> Drop Shadow negative and positive = 5 - 5 - 80 - 10,00
12- Activate Raster 1
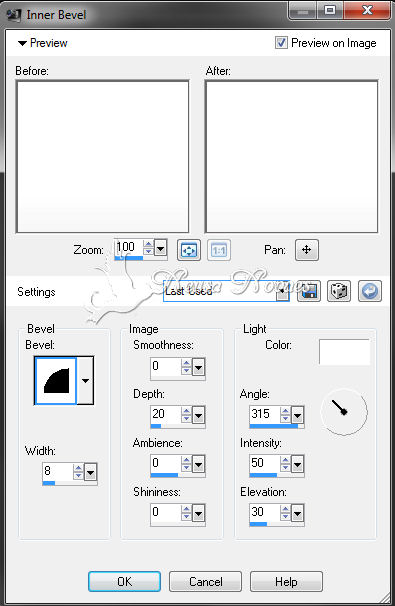
13- Layers> New Raster Layer
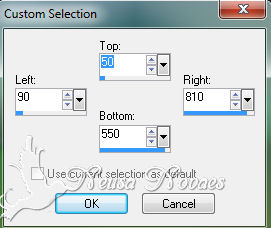
14- Activate the Selection Tool and Custom Selection as printe
15- Open your landscape tube Edit> Copy
16- Edit> Paste Into Selection
17- Activate Raster 1
18- Edit> Copy and book
Apply the attached ketmaskfademini
20- Layers> Merge> Merge Group
21- Image> Canvaz Size = 900 x 700 px
22- Edit> Paste as New Layer and then Layers> Arrange> Move Down
23- Activate the Pick Tool tool and from top to bottom pull up to 700px
24- Layers> Merge> Merge Visible
25- AAA Plugin Frames> Photo Frame being Width 30 Opacity 100 remaining 0
26- Image> Add Border = 3px matching color
27- Image> Add Border = 40px matching color
28- With the Magic Wand tool select the 40px
29- Simple Plugin> Diamonds
30- Effects> 3D Effect> Inner Bevel conform printe
31- Selections> Select None
32- Open your main tubes Edit> Copy
33- Edit> Paste as New Layer and position and shade to taste
34- Layers> Merge> Merge Visible
35- Image> Add Border = 3px matching color
36-Image> Resize = 900 x 719 px
37- Put mine and your brand

NOTE: - Do not forget to put the credits to whom right
** Tutorial created by Neusa Novaes **
October 20, 2014
Copyright reserved
Prohibited total or partial transfer, copies, alterations
publication in websites or blogs, without author's authorization.
Credits
Tubes: - Mary, Grisi, Nikita and Azalee
Mask: - Ket
Tutorial by_Neusa Novaes
