 Top My Home

Terms of use
Click on the flag of your country, for translation.
Depending on your connection the translation may take a while
2 Tubes
Muras Meister Plugin
Special Sandflowers Plugin
Plugin AAA Frames
Material HERE
Eml Tutorial HERE
Video Tutorial
HERE
Watermark
Here
PSP Effects
Script
Click on the butterfly to follow the tutorial
1- Open a transparency 900 x 600 px
2- Choose two colors and fill with the lighter color
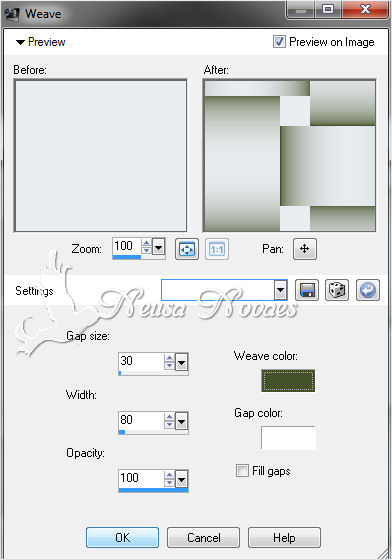
3- Effects> Texture Effect> Weave according to printe
(OBSERV: - Weave Color color has to be the chosen dark color)
4- With the pick tool, decrease from left to right up to 100 px
5- Adjust> Sharpness> Sharpen
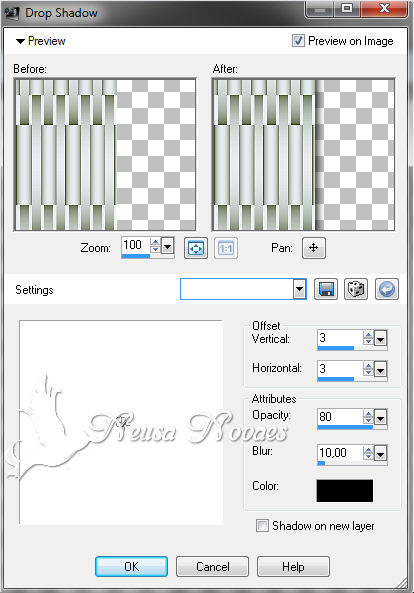
6- Effects> 3D Effect> Drop Shadow as printe
7- Layers> Duplicate
8- Image> Mirror and then Layers> Merge> Merge Down
9- Layers> New Raster Layer
10- Layers> Arrange> Send to Botton
11- Fill in the same color Linear Gradient 0 - 0
12- Open your landscape tube Edit> Copy
13- Edit> Paste as New Layer
14- Layers> Duplicate
15- Image> Flip
16- Mura's Meister Plugin> Perspective Tiling according to printe

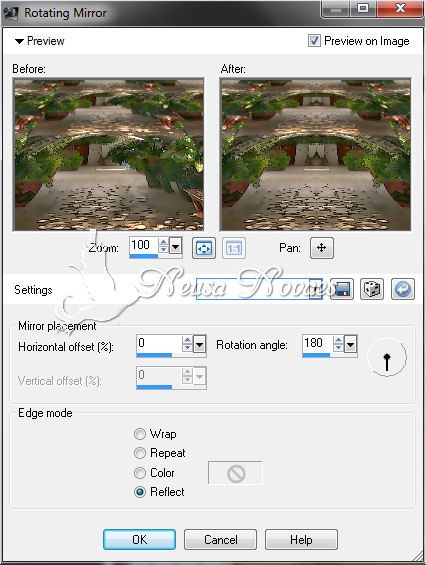
17- Effects> Reflection Effect> Rotating Mirror conform printe
18- With the Magic Wand tool select according to printe

19- Press your DEL key 5 times
20- Remove the Selection
21- Activate Raster 1 (Weave)
22- Special Sandflower Plugin> Color Switcher to taste
23- Effects> 3D Effect> Drop Shadow Negative and Positive 0 - 10 - 80 - 10,00
24- Open your main tube Edit> Copy
25- Edit> Paste as New Layer and position to taste
26- Apply light shade
27- Adjust> Sharpness> Sharpen
28- Image> Add Border = 3 px dark color
29- Image> Add Border = 10 px light color
30- Image> Add Border = 3 px dark color
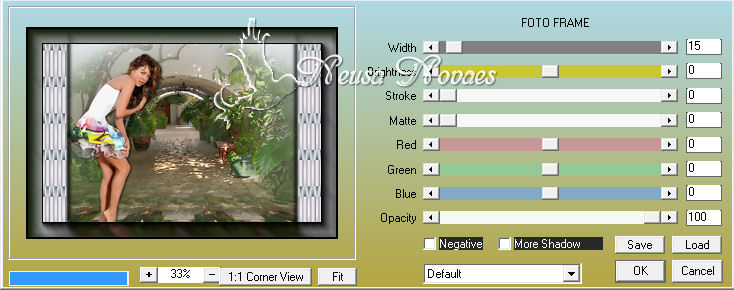
31- AAA Plugin Frames> Photo Frame according to printe
32-Image> Resize = 900 x 610 px
33- Putting mine and your brand

NOTE: - Do not forget to put the credits to whom right
** Tutorial created by Neusa Novaes **
February 24, 2015
Copyright reserved
Prohibited total or partial transfer, copies, alterations
publication in websites or blogs, without author's authorization.
Credits
Tubes: - Grisi, Linda Gatita e Luna
Tutorial by_Neusa Novaes
