Para imprimir esta página

Terms of use

 
1 Tube
 
AP Lines Plugin
 
 Alien Skin Eye Candy5 Impact
Plugin
 
 Flaming Pear Plugin
 
Muras Meister Plugin
 
AAA Filters Plugin
 
EML Tutorial  HERE
 
Video HERE
 
PSP Effects


Script


Click on the butterfly to follow the tutorial


Enjoy


Stay at Home !!!


Let´s start!!!


1.-Open a transparent 900 x 600 px

2- I put in the  Foregraund #6b1d14 and Backgraund #d4ac74

3- Fill in your transparency with Foregraund


4- Adjust> Add / Remove Noise> Add Noise as next

5- Layers> New Raster Layer


6- Fill with your Backgraund


7- Repeat item 4


8- Apply Mask Flowers


Merge Group


9- Emboss 3


10-Duplicate and Image> Horizontal Mirror and Vertical Mirror


11- Merge Down


12-Apply Drop Shadow as shown

13-Layers> New Raster Layer


14-With the same Colors make a 0 - 1 Linear gradient and fill the transparency


15-Repeat item 4


16-Apply the 20-20 mask and merge group


17- Geometrics Effects> Horizontal Perspective as shown

18-Image> Mirror Horizontal and repeat the same operation


19-Distortion Effects> Wave as shown

20- Geometric Effects> Circle


21-Muras Meister Plugin> Copies with foregraund color as shown

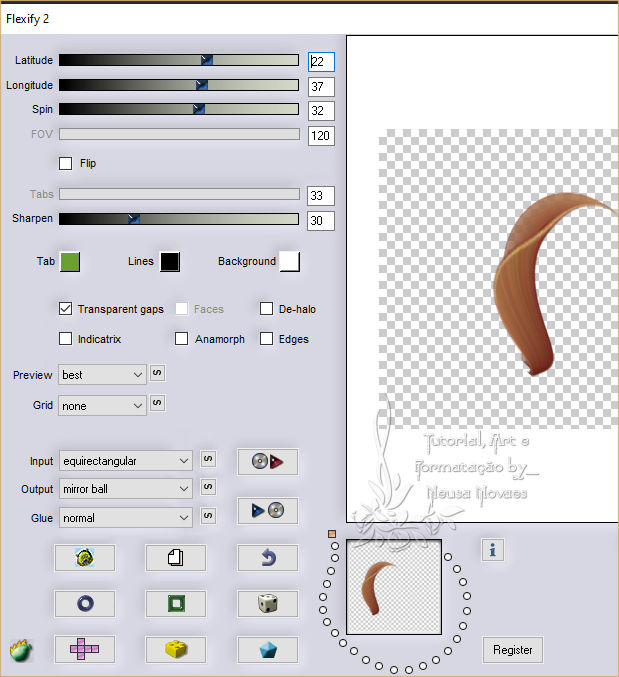
22-Plugin Flaming Pear> Flexify 2 as print

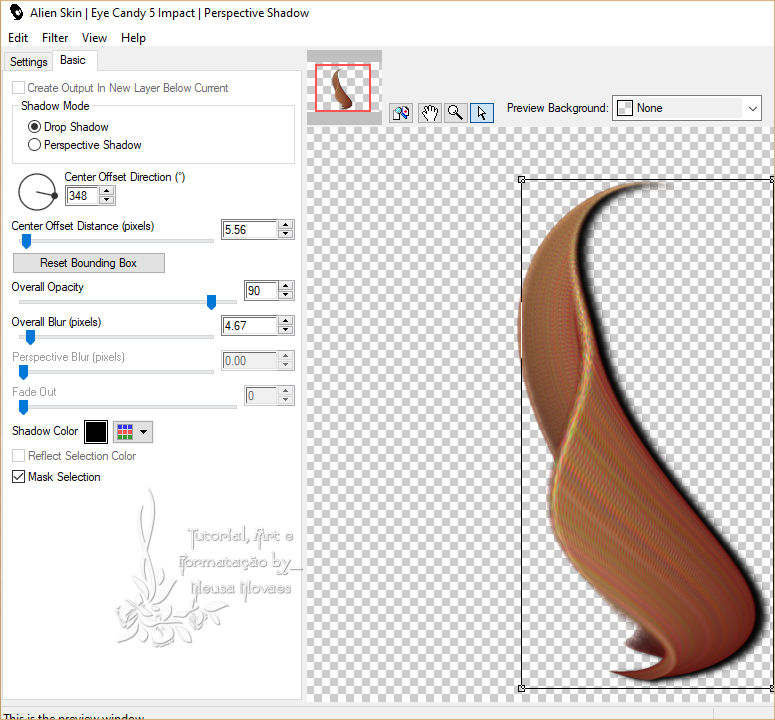
23-Plugin Alien Skin Eye Candy5 Impact> Perspective Shadow as shown

24-Duplicate and resize- 80%


25-Image Mirror and leave as per model


(with the Pick Tool move to the left)


26-Merge Down


27-Duplicate again and place according to model


28-Activate Raster 1


29- Open, copy and paste the 1397 tube from Suiza Bella in a new layer


30-Oject> Align> Left and Blend Mode = Luminance L


31-Duplicate and Horizontal Merge and Merge Down - Opacity = 60%


32-Activate Group Raster 2 - Duplicate and merge down


33-Edit> Copy Special and reserve


34- Open, copy and paste the main tube in a new layer and place it in the center of the flowers


35-Sharpness or Sharpness More and apply drop shadow to taste


36-Add Borders 3 px color that matches and select


37-Add Borders 40 px in white and invert the selection


38-Edit> Paste Into Selection what was booked


39-Adjust> Blur> Radial Blur as shown

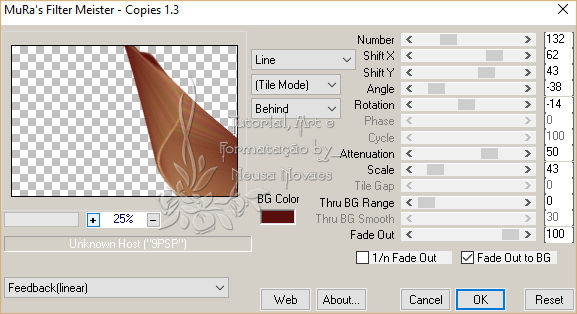
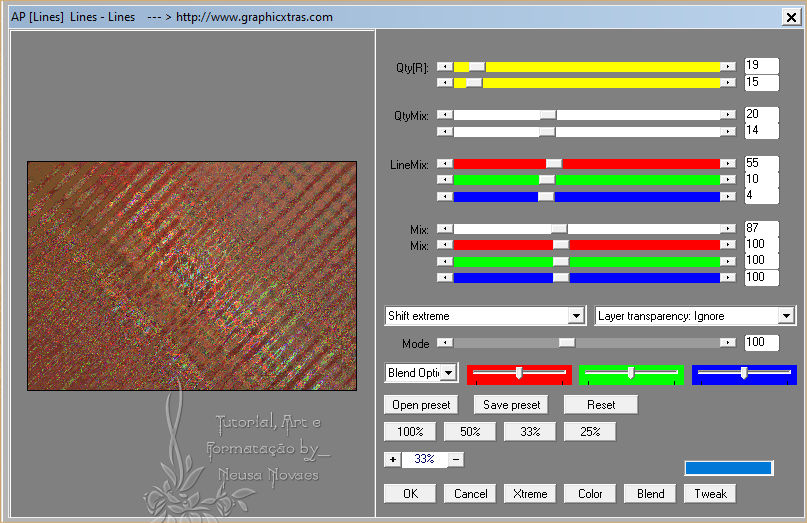
40-Plugin AP Lines> Lines Line as shown

41-Invert and apply eyeshadow to taste


42- Deselect


43-Repeat item 37


44-Put your credit and mine


45-Resize = 900 px


46-Plugin AAA Filters> Custom = Landscape


47-Save as JPG


** Tutorial created by Neusa Novaes **


August 24, 2020


Copyright reserved


Any similarity is purely coincidental.


Total or partial transfer, copies, alterations prohibited


publication on websites or blogs, without authorization from the author.


NOTE: - Do not forget to place the credits to those entitled


Crédits 

Tubes: Suiza Bella