|
 |
 Top Alegria
Termos de uso
-
Clique na bandeira de seu
pais, para a traduçăo.
-
Dependendo de sua conexăo a traduçăo pode
demorar um pouco
-
- Plugin VM Texture
Plugin Transparency
Plugin Mura´s Meister
Plugin VM Extravanza
- Efeitos do PSP
-
-
Roteiro
-
- 1- Abra nova transparęncia 850 x
450 px
-
- 2- Selections > Select all
-
- 3- Abra seu tube de paisagem
selecione 2 cores para foregraund usei #a8301f
- Background #f2cfa9 logo a seguir Edit > Copy
-
- 4- Edit > Paste Into Selection
-
- 5- Selections > Select None
-
- 6- Layers > New Raster Layer
-
- 7- Layers > Arrange > Send to
Botton
-
- 8- Preencha com gradiente Linear 45
- 1
-
- 9- Ative a raster 1 e Layers >
Merge > Merge Down
-
- 10- Effects > Image Effect >
Seamless Tiling = Default
-
- 11- Adjust > Blur > Gaussian Blur
conforme printe = Radius 20,00
-
- 12- Plugin Unlimited 2 > VM Texture
> Cross Weave conforme printe
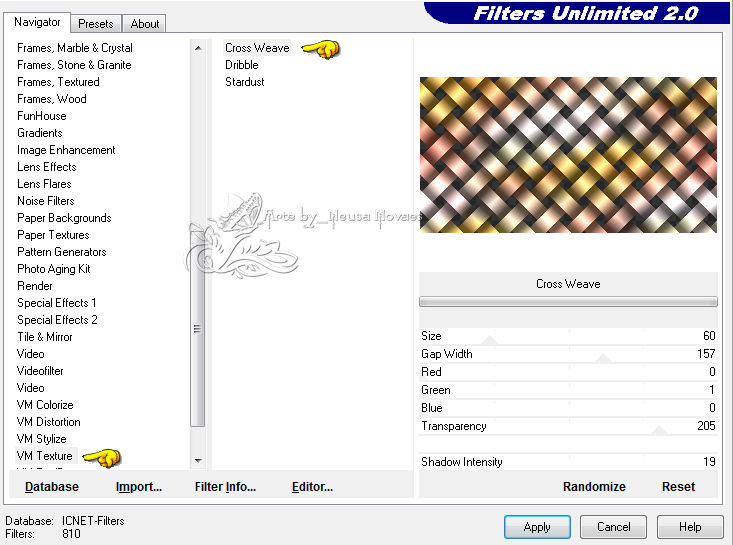
-
- 13- Plugin Transparency > Eliminate
Black
-
- 14- Repita itens 6 - 7 - 8 e 9
-
- 15- Effects > Geometric Effect >
Perspective Horizontal = 80 - Transparent
-
- 16- Image > Mirror
-
- 17- Repita item 15
-
- 18- Effects > Reflection Effect >
Feedback conforme printe
-
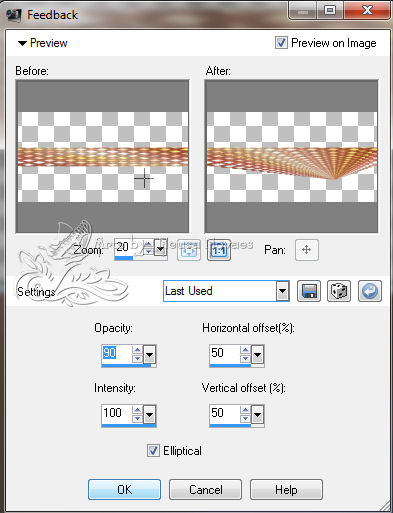
-
- 19- Plugin Muras Meister > Copies
conforme printe
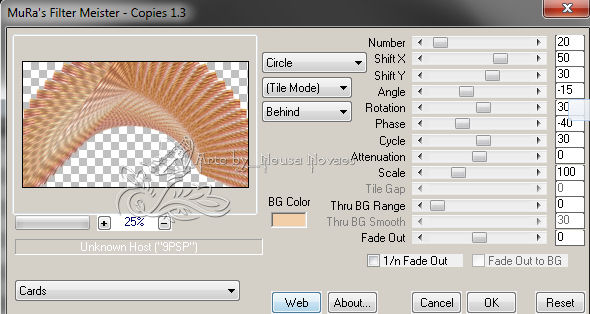
-
- 20- Effects > Reflection Effect >
Rotating Mirror = H = 0 - R = 0 - Reflect clicado
-
- 21- Com a ferramenta Pick Tool
subir até 250 px conforme printe
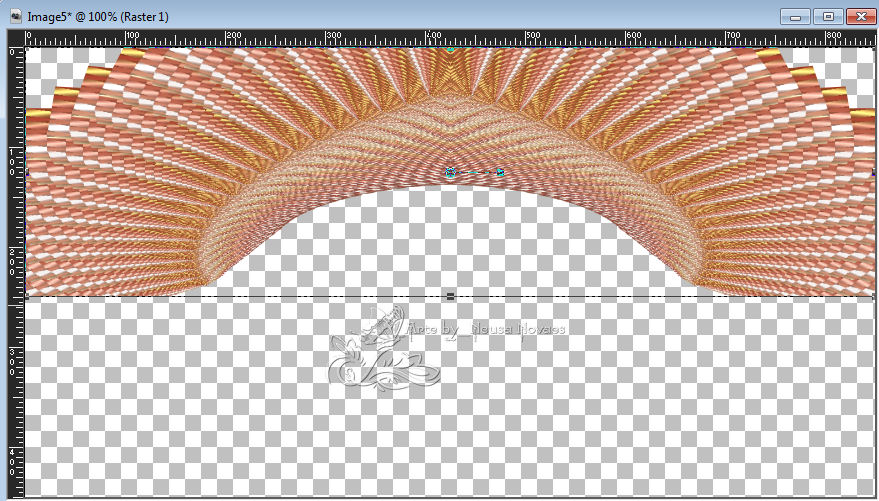
-
- 21-
Adjust > Sharpness > Sharpen
-
- 22-
Layers > Duplicate
-
- 23- Image > Flip
-
- 24- Effects > Distortion Effect >
Twirl conforme printe
-
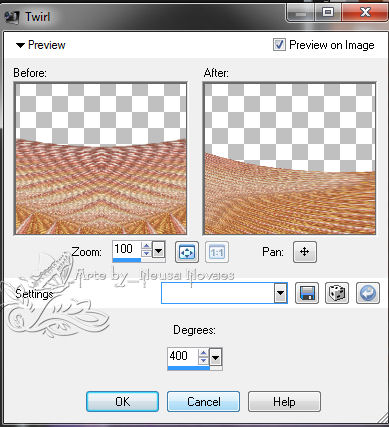
-
- 25- Layers > Merge > Merge Down
-
- 26- Com a ferramenta Magic
Wand selecione a parte transparente
-
- 27- Layers > New Raster
Layer
-
- 28- Abra uma flor e faça
uma Pattern Angle 40 Scale 19
-
- 29- Preencha a
transparencia com sua pattern
-
- 30- Selections >Select
None
-
- 31- Layers > Arrange >
Move Down
-
- 32- Repita item 27
-
- 33- Layers > Arrange >
Send to Botton
-
- 34- Preencha com cor do
seu foreground
-
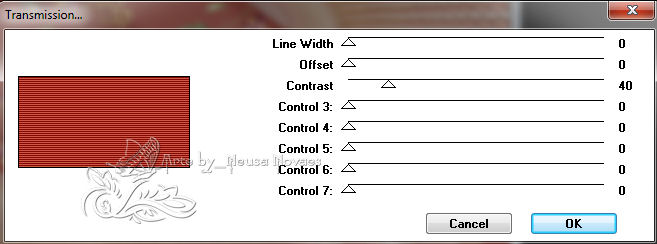
- 35- Plugin VM Extravaganza
> Transmission conforme printe
-
- 36- Adjust > One Step
Photo Fix
-
- 37- Layers > Merge > Merge
Visivel
-
- 38- Edit > Copy e reserve
-
- 39-
Image > Canvaz Size 920 - 520
sendo 35px em todos
-
- 38- Repita item 26 e 27
-
- 39- Edit > Paste Into
Selection
-
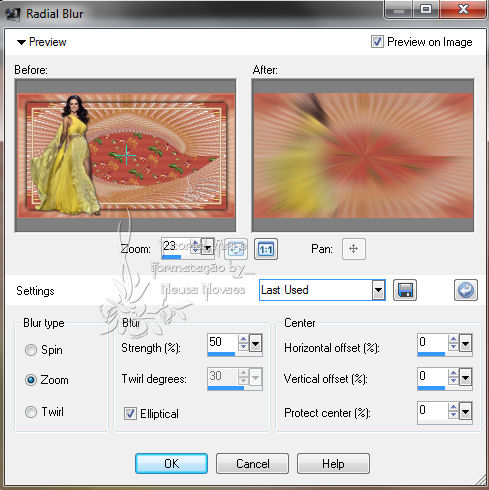
- 40-
Ainda Selecionado Adjust > Blur >
Radial Blur conforme printe
-
- 41- Selections > Invert
-
- 42- Effects > 3D Effect >
Drop Shadow negativo e positivo 5 - 5 - 80 - 20,00
-
- 43- Selections > None
-
- Layers > New Raster
Layer
-
- 44- Layers > Arrange >
Send To Botton
-
- 45- Preencha com a cor
clara
-
- 46- Ative a Marged e
Selections > Select all
-
- 47- Selections > Fload
-
- 48- Selections > Modify >
Contract = 20
-
- 49- Selections > Modify >
Select Selection Border = Inside clicado - 8 px
-
- 50- Repita item 43 e 45
-
- 51- Effects > 3D Effect >
Inner Bevel conforme printe
-
-
- 52- Selections > Select
None
-
- 53- Repita item 42 = 1 -
1- 80 - 1,00
-
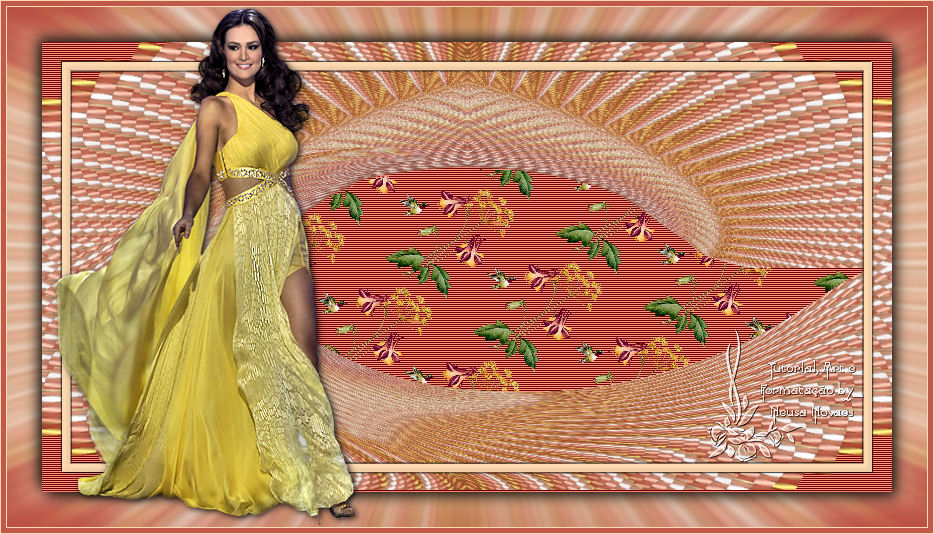
- 54- Abra seu tube
principal Edit > Copy
-
- 55- Edit > Paste as New
Layer e posicione-o á gosto
-
- 56- Aplique drop shadow á
gosto
-
- 57-
Layers > Merge > Merge
Visible
-
- 58- Image > Add Border = 1
cor clara
-
- 59- Repita item 57 = 5 cor
escura
-
- 60- Repita item 57
-
- 61- Coloque minha marca e assine
-
- 62- Image > Resize 900 x
515 px
-
- 63-
Salve em JPG
-

-
- OBSERVAÇĂO:- Năo esqueça
de colocar os créditos a quem de direito
-
-
- ** Tutorial criado por
Neusa Novaes **
- 26 de Abril de 2014
-
- Direitos autorais reservados
- Proibido repasse total ou parcial, cópias,
alteraçőes
- publicaçăo em sites ou blogs, sem autorizaçăo
da autora.
-
-
-
-
 Créditos
-
- Tubes:
Ket, Nini e Grisi
- Flor:- Recebido grupo
de trocas sem autoria
- Tutorial
by_Neusa Novaes
-
-
- Outras Versőes
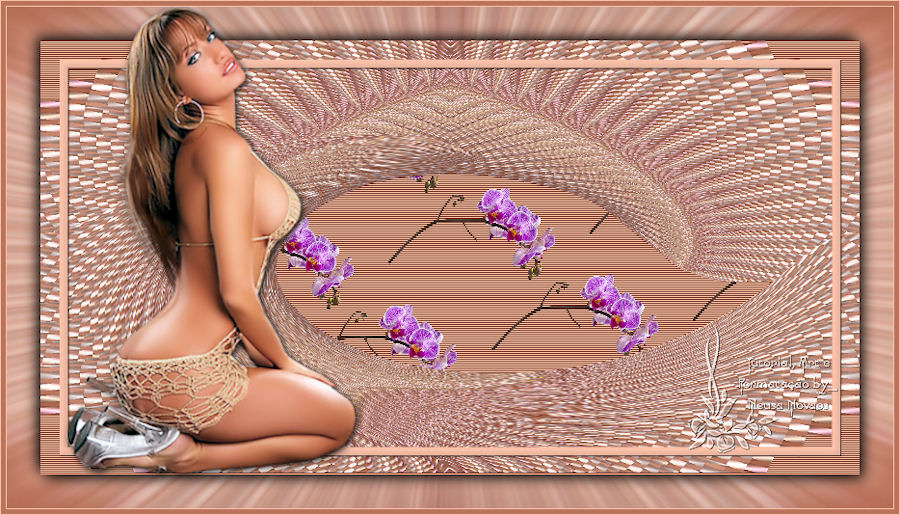
- Neusa Novaes
-

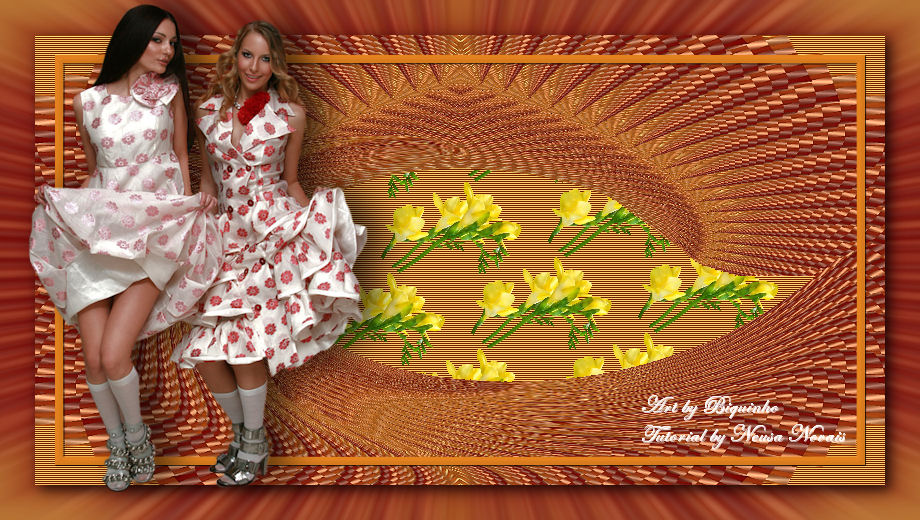
- Outra Versăo
- Neusa Novaes
 - Célia
|
| |
